Showing posts with label baby-led weaning. Show all posts

Friday, April 27, 2012

Guacamole BLT Sandwiches

My son had apparently been paying better attention to a Food Network show over the weekend than I had, and told me that he had seen Guy Fieri making a BLT with guacamole.  He started begging me to make them.  He has really enjoyed the guacamole recipe I've been using, almost as much as his father and I have.  It was such a good idea! 

I had held off on giving baby any bacon.  I've been getting into the habit of buying the low sodium bacon in preparation for her tasting as well as to just make a healthier change in our diets.  I happened to have bought large tomatoes in bulk at the warehouse store as well as avocados.  So we had tomatoes sandwiches at lunch because the tomatoes were perfect for eating.  Baby apparently really liked them, because as she saw me prepping everything for the guacamole BLT's, she started to get excited about the tomatoes.  I haven't given her any leafy greens yet, because I still consider them to be a bit of a choking hazard at this age.  So she got some tomato, tortilla chips and her first taste of bacon.  She loved the bacon!


Ingredients

Guacamole
Bacon
Tomatoes
Lettuce
Bread
Mayonnaise


To make the guacamole BLT's, I made this guacamole recipe and let it set in the fridge.  I baked the bacon by placing it on a baking sheet and putting it in a cold oven, then heating to 400 degrees for 20 - 25 minutes.  While the bacon was baking, I sliced the tomatoes and set them aside.  When the bacon was done baking, I toasted the bread.  Don't skip the toasting step.  It is very important to the structure of the sandwich.  If you don't toast the bread, the sandwich will get very soggy and fall apart.  I like mayonnaise on my bread, so I smeared both mayonnaise and guacamole on both pieces of bread and then layered bacon, tomatoes and then lettuce and then second piece of bread.  Slice and enjoy!

Thursday, April 26, 2012

Quick Personal Pizzas

I really don't remember where I saw this, or something like this.  But, I know that www.pillsbury.com has a few similar ideas.  I went looking to see if that was where I saw it, but I didn't see exactly the same thing.  Simply put, I used the Grands Biscuits as the pizza dough.  I happened to have "stocked up" on a few cans because they were on sale and I had coupons.  I already had fresh mozzarella on hand from the warehouse store and I had stocked up on pasta sauce when it was on a deep sale and I had coupons.  I buy pepperoni in bulk at the warehouse store.  I needed something quick for lunch.  I had the fixing's for these Quick Personal Pizzas.  Baby liked them too.


Quick Personal Pizzas

Ingredients

2 cans of Pillsbury Grand Biscuits
16 oz. of fresh mozzarella (the soft round stuff is better than the brick stuff, but use what you can)
Pizza sauce or pasta sauce
Pepperoni
Or what ever toppings you like

Directions

Preheat oven to 375 degrees.  Grease your cookie sheet.  Slice the mozzarella and set aside. Press biscuits flat on the cookie sheet.  I was able to fit 5 - 6 biscuits per cookie sheet.  Top with sauce, cheese, pepperoni, or your favorite toppings.  Fresh mozzarella melts and spreads, so don't be too generous with your slicing, unless you like cheese crisps too.  Bake for approximately 18 minutes.  Check after 15 minutes though, since ovens are different.  Let the pizzas rest for about 5 minutes before eating.  You want the cheese to cool down so that you don't burn your mouth - or have to comfort a child who burned their mouth.

Wednesday, April 25, 2012

Making Yogurt in My Crock Pot

I've made my own yogurt before, when I was making my own baby food with the past two babies.  I only made it a few times though, because it took time and I had to babysit it.  I had three cookbooks that I used for making my own baby food.  The method I used was in this cookbook.  I used sterilized tools, jars and such and had to let it sit in a cooler.  I wanted to make yogurt again, but wasn't interested in the process I had used back then.  Recently I saw making yogurt in the crock pot on Pinterest.  Interest piqued!  So I decided to give it a try.  It is sooo much easier!

This was my third time with this method from Stephanie O'Dea at A Year of Slow Cooking.  The first attempt I didn't have a thick enough towel wrapped around my crock pot, so the temperature dropped really quickly and the yogurt didn't thicken up.  The second attempt, I remembered about the thermal carrier that came with my crock pot and wrapped a towel around that.  It worked!  This third time, my timing was just a little off on getting the crock pot wrapped up for the night, but that was because we were eating our dinner at the same time.  It was a little thinner, but still thickened yogurt! 


Wrapped up in the thermal carrier to incubate for the night.


A heavy beach towel wrapped around the thermal carrier for more insulation.


Yogurt in the morning!


My kids don't eat plain yogurt, but like a bit of flavor, so we had tried putting frozen blueberries in it, but that didn't exactly work. So this time I had purchased some fruit preserves. Voila! It's a hit with those of us who decided to try it! Baby couldn't get enough and she couldn't get it fast enough! That means I'll be doing this a lot now, especially since I have a Naan recipe that calls for yogurt.

The process:

Put 1/2 gallon of milk in the crock pot on low for 2 1/2 hours.  Turn the crock pot off and let it set covered for 3 hours.  At that point, put 1/2 cup of yogurt starter in a bowl and add 1 - 2 cups of the yogurt you are making to it and mix well.  This tempers the starter so it doesn't curdle.  Add the starter mixture to the yogurt in the crock pot and gently mix well.  Cover the crock pot with a heavy towel or two or an insulated carrier with an extra towel.  Let it set for 8 hours or for the night!  Don't bake bread the day you make the yogurt or the day before.  Don't want the yogurt to taste like bread!

I'm going to try using a gallon of milk next time.

Tuesday, April 24, 2012

Grilled Chicken Bruschetta Pasta with Balsamic Glaze

This idea was inspired by a dish I had at a restaurant a few years ago.  I don't remember which restaurant it was or what the dish was called.  But, I tried to re-create it or at least come somewhat close to it a few days later at home.  I've done it a few times since.  Missing from the pictures is the balsamic glaze that I bought from Costco.  I need to try and make my own, because they don't carry it anymore and half of us love it.  That chunk that's wrapped in plastic in the first picture is what is left of my fresh Parmesan.  Almost to the rind.  Pretty much ready to use as flavoring in a soup now.  I only had enough to shave a little bit for the picture.  The rest of us had already grated Parmesan, which wasn't bad, but shaved Parmesan is just so much more elegant and fresh tasting.  I need to get some on my next Costco run.  I buy my bruschetta at Costco, because it's cheaper there than at the grocery store.


Because Steve was grilling over the weekend, I had him put some chicken thighs on for this meal.  That made it so much quicker to assemble the night I was ready to serve this.  I have bought the "grilled chicken strips" at the warehouse store before, but they didn't have the frozen ones and the fresh ones were just too expensive.  Truth be told, looking at the label on the fresh ones, there were things added that lead me to believe that they were preservatives, since expiration date on the package was a month from now.  I didn't feel like paying for that when we could just grill our own ahead of time.  The charcoal was smoldering by the time the chicken finished grilling, so it ended up being half grilled and half smoked.  It added an incredible flavor, flavor that certainly can't be matched by pre-packaged "grilled" chicken.  If you decide to grill your own chicken ahead of time, keep the pieces whole, so they don't dry out when you reheat them.


Top the cooked pasta with warm bruschetta and grilled chicken.  Shave Parmesan over top.


Drizzle with balsamic glaze.  I'm telling you, the flavor is insane!


Somehow, I missed getting a  picture of baby eating this, but she absolutely loved it.  Oh wait, that's right, I was also working on yogurt in my crock pot.


Grilled Chicken Bruschetta Pasta with Balsamic Glaze

Ingredients

1 lb. pasta (I use Angel Hair because it just makes it seem more elegant)
Bruchetta, desired amount warmed up
Grilled chicken (I used thighs this time, but boneless, skinless breast slices nicely)
Big chunk of fresh Parmesan cheese for shaving (pre-grated will work in a pinch)
Balsamic glaze


Directions

Cook pasta according to package directions.  Top cooked pasta with desired amount of warm bruschetta.  Top with slices or chunks or shredded grilled chicken.  Shave fresh Parmesan over top (I use a vegetable peeler).  Drizzle with balsamic glaze.  Enjoy!

Monday, April 23, 2012

More Baby-Led Weaning AKA Self-Feeding Baby

I've had six babies and now I finally have one that begs to eat the food that I'm eating.  She gets excited to try something new.  She asks to try something new off my plate and if I don't notice or give her some to try she gets upset or sad.  Can you imagine that?  I think it's all because of Baby-Led Weaning too.  I wish I had known about this with the other babies.  I was happy to make my own baby food with the last two babies, because it was saving money and I knew what was in the food.  But, had I known how easy and safe it was to actually feed them from my plate, I would have done that.  Last week I was eating some hot cereal and I put a little bit in a small cup to cool for her to try.  She went crazy over it and kept asking for more.  When she finished what I had put aside for her, she got upset when I tried to put more in the fridge to cool down.  She didn't want to wait for it!  Turned out it was cool enough to not put in the fridge.

Day one of hot cereal.  I've been pre-loading spoons for her and she is learning how to use them.  She's getting better.


Oh, that's good!  She needed a bath when she was done.  She had it all over her and in her hair and it wasn't coming out when I tried to wipe her up.


Day two of hot cereal.  This time she had footed pj's on, so clean up was much easier!  Not so much in the hair either.


Signing for more.


Oh so happy about the hot cereal!


Oh so sad that she finished it!


Baby-led weaning is so worth it!  I highly recommend it!

Tuesday, April 17, 2012

Bacon Wrapped Chicken Legs and Fingerling Potatoes

Chicken Legs were on sale again and I bought 2 packages.  I was trying to think of what to make for dinner and it hit me.  Wrap the chicken legs in bacon!  It's not bacon wrapped chicken breast, but it IS bacon wrapped chicken.  Just as good!  I used 2 pieces of bacon for each leg.  Approximately 3/4 lb. of bacon.  I took the skin off, because I just don't like the skin.  There will be enough fat with what is left on the chicken and what is in the bacon.  And the bacon provides that crisp factor.

We haven't prepared the grill for grilling season yet, so I wasn't sure if there was enough propane and I haven't used the charcoal side yet.  I need to have Steve show me how to do that again.  So, instead of grilling the chicken (which would have been nice since it's 80 degrees outside) I decided to attempt broiling it inside. 

After wrapping the bacon around the chicken, I covered the pan with foil and let it sit to warm up a bit.  One thing I have learned from Food Network, is that it is a very good thing to let your meat warm up a bit before cooking or grilling, so that it cooks more evenly.  I did not season the chicken because the bacon had seasoning in it already.  I used low-sodium bacon so that the baby could eat it too.  I preheated the broiler and put the broiler pan in with the foil still on it for about 20 minutes.  Then I took the foil off and continued broiling for about 20 more minutes.  The chicken came out with a pinkish color, but that's what happens with meat that's been smoked, so I'm assuming that's just the result of wrapping with bacon.


Don't you wish this was scratch 'n sniff?

I decided to serve pan-fried fingerling potatoes.  Aren't they beautiful?  I love fingerling potatoes.  Sometimes there are some pretty purple ones.


Here I've put them cut side down in a hot pan with butter and olive oil and 2 smashed cloves of garlic.


After frying for about 5 minutes, or until the cut side was nicely browned, I flip them over and continued frying for another 5 minutes, or until they were fork tender.


After the potatoes were done, I sauteed some zucchini with shallot and minced garlic  Why smashed cloves with the potatoes and minced with the zucchini?  Because the potatoes need to cook longer than the zucchini and minced garlic would have burned.


What did baby think of all this?  She kept handing her fork back to me to reload for her.  She couldn't get enough!  Until she saw that chocolate cookies were for dessert.  Then she was ready for chocolate!  The chicken was a hit with everyone in the family.  Definitely a keeper!  We are going to have to try it on the charcoal side of the grill this season.

 So to recap:

Bacon Wrapped Chicken Legs


Ingredients

1 Family pack of chicken legs (mine turned out to be 5 legs)
3/4 lb. of bacon (I used low-sodium)

Directions

Wrap chicken legs with 2 pieces of bacon.  Cover with foil and let sit out for about 30 minutes to warm up.  While the chicken is sitting, preheat broiler.  I left the oven rack at it's regular location.  Broil with foil on for about 20 minutes.  Take foil off and continue to broil for about 20 more minutes.  Check the temperature of the chicken to make sure it is fully cooked.


Pan Fried Fingerling Potatoes


Ingredients

Approximately 2 lbs of fingerling potatoes, cut in half
2 Tablespoons olive oil per round of frying - basically to your taste
2 - 4 Tablespoons butter per round of frying - basically to your taste
2 Garlic cloves, smashed, per round of frying - again, basically to your taste

Directions

Heat pan.  Add butter and olive oil.  The olive oil is suppose to help prevent the butter from burning, but I found I needed to drain and add fresh butter, oil and garlic for each round of frying.  When butter has melted, add the potatoes, cut side down.  Fry for approximately 5 minutes, or until the cut side is golden brown.  Turn the potatoes over and continue frying another 5 minutes, or until fork tender.

Sauteed Zucchini


Ingredients

2 zucchini, halved lengthwise and sliced
1 - 2 shallots, sliced
2 teaspoons minced garlic
2 Tablespoons olive oil
2 - 4 Tablespoons butter

Directions

Add butter and olive oil to heated pan.  Once butter is melted, add zucchini, shallots and garlic.  Saute for about 7 minutes, or until tender, stirring frequently.


Wednesday, April 11, 2012

A Very Non-Traditional Easter for Us

I mentioned in my previous post that we have been fighting a nasty cold virus around here.  It was bad enough to keep the whole family home from church on Easter Sunday.  That was a first.  I've stayed home with a sick child once or twice before on Easter Sunday, but this was the first time the whole family was home.  We did not want to share this virus with our church family.  So instead of going to church we did some Easter activities at home. 

First of all, the kids and I watched The Animated Passion of the Christ on Good Friday.  Then Saturday night, Steve and I watched the original Passion of the Christ with our oldest.  Then Sunday morning we watched The Animated Passion of the Christ again as a family.

We also dyed some eggs.  I have a confession to make.  In 16 years of parenting, I can't remember ever dyeing eggs.  Ever.  Seriously.  I really don't know why.  I was inspired by Pinterest.  I had seen ideas for spider web eggs, kool-eggs and dyed deviled eggs.  And so, I present to you...kool-marbled deviled eggs.


First of all, I boiled the eggs in 2 pots.  Why 2 pots?  Well, I had some eggs that were old enough to boil and peel without much trouble, and I had newer eggs.  I boiled them separately with 2 different methods.  I wasn't sure how the newer eggs were going to turn out because I've had difficulty with new eggs before.  But, I had read about another method, so I gave it a try.  The older eggs I brought to a boil, covered, removed from the heat and let set for 10 min.  The newer eggs I added 1 tsp of salt to the water, brought to a boil, covered, removed from the heat and let set for 15 minutes.  Both methods worked!  Now I can boil new eggs and know they will peel just fine! 


Here are the packages of Kool-Aid I was able to find at my regular stores, mixed with 2/3 cup of water in each cup.  Not a lot of color options outside of the range of pinks and reds.  Vinegar is not needed because of the citric acid in Kool-Aid. 


It's a little hard to see here, but the eggs are gently cracked to allow some of the coloring to seep through.


The colors are pretty, even though we don't have any blues or greens.


This picture is larger to show the pretty designs on the shells.  The shells need to dry.


They peeled well and I love the marbling effect!


If you've never made deviled eggs before, it is rather simple.  I don't use measurements but go by feel and taste.  I'll try to give a general guide though.  Cut the eggs in half and put the yolks in a medium sized bowl.  Crumble the yolks with a fork.  Add approximately 1 cup of mayonnaise, 1 - 2 Tablespoons of mustard, a dash of salt and a dash of sugar to the yolks and blend well.  It should be a little pasty at this point.  Next, add a splash of either vinegar (white or apple cider - both work) or pickle juice (if you happen to have it on hand) to make a creamier texture.  Taste and make sure you like the seasoning.  Adjust if necessary.  Depending on how many eggs you've used, you may need more or less of the mayonnaise and mustard.


When you have a creamy texture, it is time to fill the egg whites with the yolk mixture.  You can use a spoon or you can use a pastry bag with a tip to make it look fancier.  Or, if you don't like washing out pastry bags and tips, you can fill a Ziploc bag and cut off a corner to fill the whites.  I like to use Ziploc bags, because you can make it ahead of time and assemble at your destination, if you are taking them somewhere, and not get that dried out look on the yolks.  Using a container to hold your bag makes it easier to fill.


Once you have your yolk mixture in the bag, seal it and make sure to eliminate as much air as possible.  At this point you can store the egg white and yolk filling in the fridge until you are ready to travel or serve, but don't snip the corner until you are ready to fill the whites.


When you are ready to fill the whites, snip off a corner and then pipe the yolk filling into the whites.  It was a challenge to pipe and take the picture at the same time.


Just loving that marbled effect!


If desired, sprinkle a little paprika on the yolk filling.


Baby tried her first deviled egg and was intrigued by the texture and taste.


Later on, after some had naps, we made "Empty Tomb Rolls".  The symbolism was a good way to finish the day, especially since we had watched The Passion of the Christ, so everything was fresh in every one's minds.  The 4 middle kids thought it turned out pretty neat.  Here's a close up of one of the rolls fresh from the oven.  See the empty tomb?  They taste really good.  We will definitely make them again.


I hope your Easter was an enjoyable one!

Wednesday, April 4, 2012

Baby's 1st Birthday and Her Cake is...Oreo Pudding Poke Cake!

We recently celebrated baby's 1st birthday.  She hasn't really been a fussy eater, so I was challenged in deciding what to make for her meals.  See, we have a tradition around here of the birthday person choosing the meals for their birthday.  So I needed help from the family in deciding what we were going to eat for baby's birthday. 

We settled on cinnamon sugar blintzes for breakfast, which she hadn't had yet.  We love blintzes!  They are rather simple, but they take time to cook enough for each person.  So it ends up taking me, or the person who jumps in and helps me, usually Steve, about an hour to cook and serve everyone.  For that reason alone, we only do them on occasion.  She seemed to enjoy her blintz.


Then for lunch we treated ourselves to some Papa John's pizza, which the kids tell me is second to my homemade pizza.

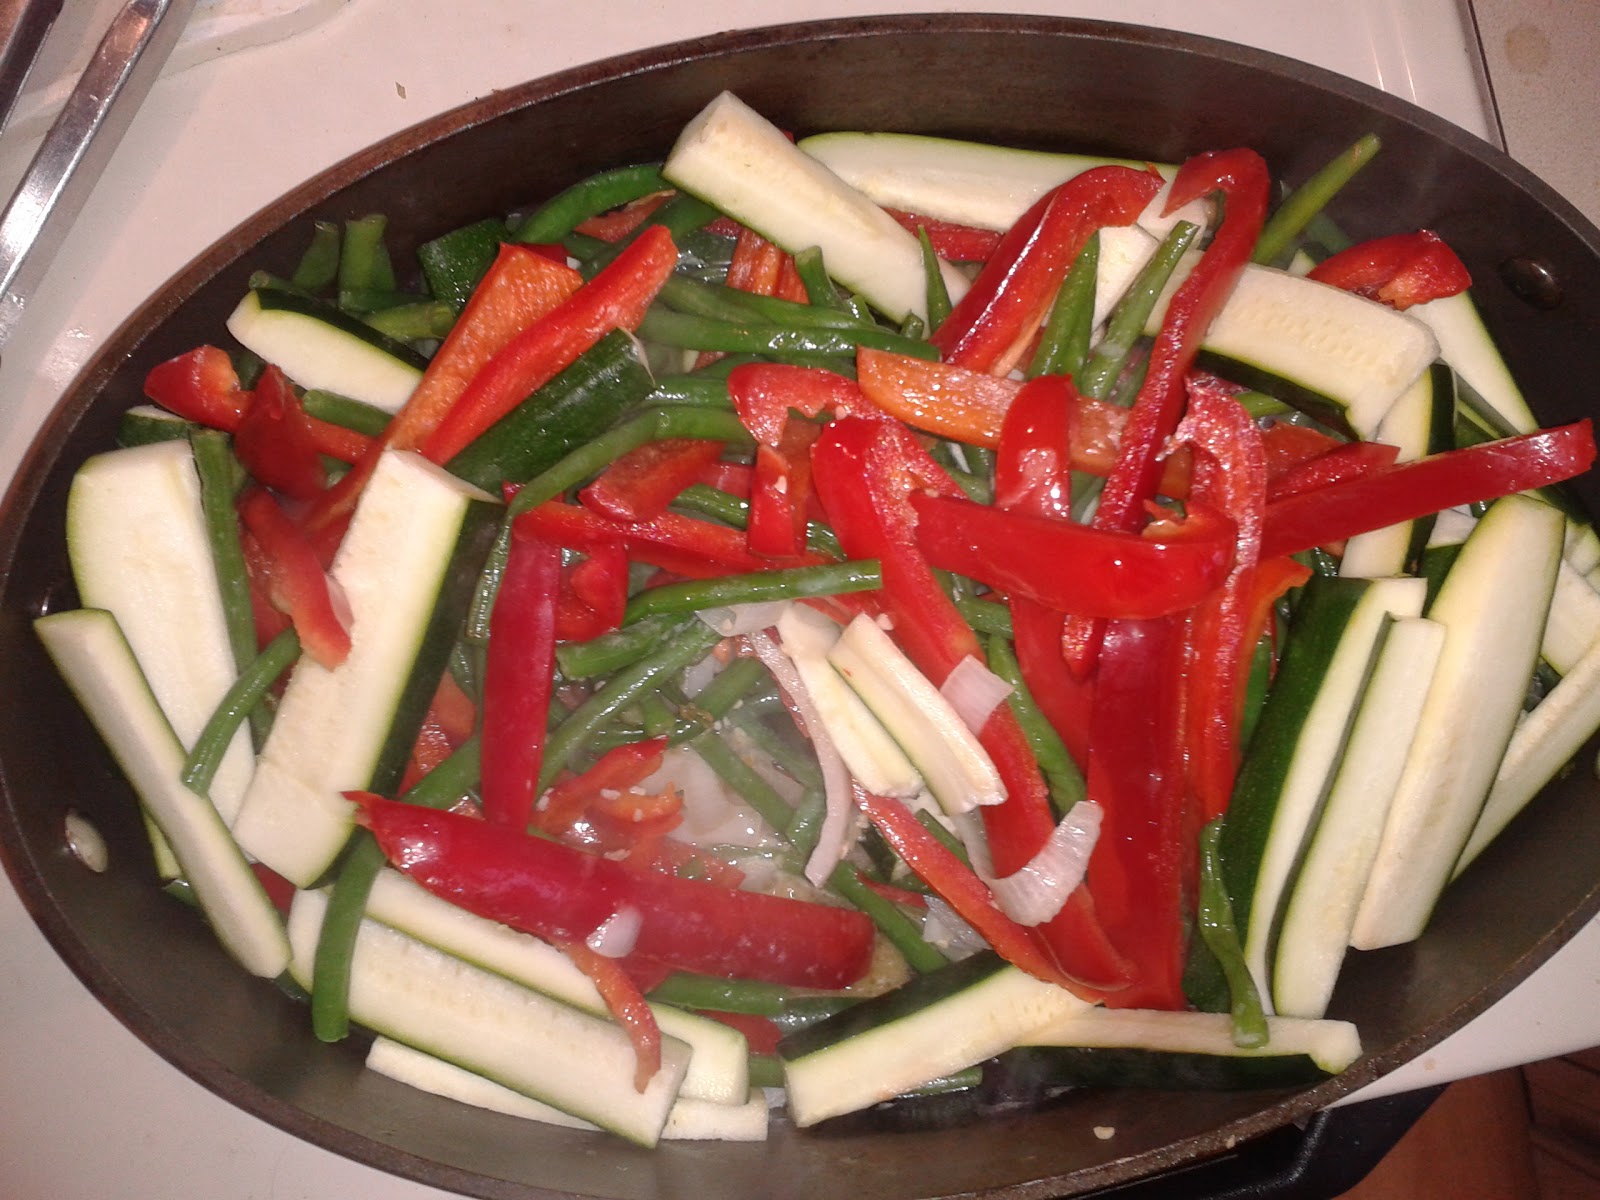
For dinner, we had panko breaded tilapia (which sometimes is nice to have on hand from our local warehouse store)and sauteed veggies.  I have sauteed frozen green beans many times and change it up each time.  This time around, I had bought some red peppers that were a manager's sale for $.99/lb.  I also had bought some green squash after lunch on my weekly grocery trip.  So, Steve suggested adding both of them to the green beans this time.  Such a good idea!  No real recipe, just more or less throwing good things together to make them even better.  But, I realize that a recipe format might be easier.  So here it is:

Ingredients:

1/2 c unsalted butter
Approx 3 Tablespoons of extra virgin olive oil
2 green squash, halved and sliced lengthwise
3 red peppers, sliced lengthwise
1 onion. sliced
2 - 3 generous handfuls of frozen petite green beans (I get these in bulk from our warehouse store)
2 - 3 cloves of garlic chopped (or a couple teaspoons of pre-chopped garlic)
Fresh ground sea salt, to taste
Fresh ground pepper, to taste

Here I had sliced lengthwise the green squash, red bell peppers and onion.


Melt the butter and add the extra virgin olive oil.  Saute the onions and garlic for about 2 minutes.  Add the rest of the veggies.


And saute until tender.  Doesn't that look good?  If you like your squash firmer, just add it a little later.


She sure thought her dinner was good!  See that cupcake on her shirt?  Totally unplanned!  Steve dressed her in that outfit in the morning.  Good job, right?


Now, her birthday cake!  I got this inspiration from Pinterest.  The link that had been pinned lead me to Chef-in-training, but she got it from The Country Cook.


Ingredients:
1 Box Chocolate Cake Mix
Ingredients needed to make cake (usually eggs, oil and water)
2 (4 oz.)packages of Instant Oreo pudding
4 cups milk (2% or higher)
Crushed Oreo Cookies (optional)

Directions
Make cake mix according to directions and bake in a well-greased 9x13 pan (I use the nonstick spray that has flour in it).
Just before cake is done, start making pudding. In a medium bowl, add milk to pudding mixture and continue to whisk until most of the lumps are removed. Let pudding mixture sit for about 2 minutes. You want it to thicken slightly so it isn't overly runny but not fully thickened into pudding.
Pour pudding mixture over warm cake.
When cake is finished, while still warm, poke holes all over cake (about 1-inch) intervals using a wooden spoon handle or a straw.  (I didn't get any pictures of thus, but Brandie, aka, The Country Cook did)
Spread it out with a spoon and gently push down on the pudding to help get it into the holes.
Allow the cake to cool for several minutes on the counter then put into the fridge to set up. About an hour.
Once it is set, top with crushed Oreo cookies


Cook’s Note: This is great with so many different combinations; yellow or white cake mix with chocolate pudding is a good one. The Oreo pudding combination is our favorite.
Enjoy!

Steve helped make and bake the cake while I was checking out at the grocery store and making my way home with birthday balloons and groceries.  We used a dark chocolate cake mix.  I wanted her first taste of chocolate to be a good one, as well as memorable.  Here's what the cake looked like after poking the holes with the wooden spoon handle and pouring the Oreo pudding over top.


Since it's Oreo's 100th birthday, and I had found these on sale a week or two ago, we used them.  How appropriate!


My 12-year-old son crushed the Oreo's in a Ziploc bag with one of my pans.


My 10-year-old daughter sprinkled the crushed Oreo's over the cake.


My 7-year-old daughter was my helper at the store.  My little dilemma in deciding to make a cake that doesn't leave room for writing on the top was, how to identify that this is a 1st Birthday Cake.  We had decided to get these letter candles that I had seen on a previous grocery trip, and she had suggested that we get the 1 too.  Smart girl!  Warning though, the letter candles are basically a one time use candle set.  The letters end up melting away too quick to use again.  No biggie.


Apparently the B candle looked yummy!


Finger in the cake!


Her first official taste of chocolate!


Oh yea baby!  That was good!


Well, would this make you happy?


She seemed to think it was good enough to lick the plate!


Definitely a happy birthday cake for her!  To be honest, I think a couple of us had a second helping.  Believe me, it will be worth your time to try and make this cake.  Thank you for sharing the recipe Brandie!